And an update on the Bling-Monster tulle wrestling mentioned in yesterday's post. You will be pleased to know that she has willingly handed it over for the greater good (ie so it can be made even more pretty when it's filled with flowers and worn as a fairy skirt).
Friday, June 4, 2010
Sock Monkey Love
And an update on the Bling-Monster tulle wrestling mentioned in yesterday's post. You will be pleased to know that she has willingly handed it over for the greater good (ie so it can be made even more pretty when it's filled with flowers and worn as a fairy skirt).
Wednesday, June 2, 2010
Tiny Doll Carrier Tutorial (pic heavy)
- Cut out all the fabric pieces. Put the 2 bag pieces together. Fold them again so the fabric is in quarters and gently round off the corners on one side. Open out. You should have two oval shapes.
- Round off one edge of the bag closure pieces of fabric. Stitch the two pieces together, leaving the short straight edge open. Clip curves and turn right sides out. Press and stitch one half of the velcro to the curved end.
- Fold the handle strip in half lenghways and press. Open it out and fold the two long edges into the centre and press again. Fold the two folded edges together so they meet. Press and stitch close to the long edge.
- To make the pockets, fold over the top edge of the pocket strip twice, as if to hem it. Stitch. Cut the strip into three pieces. 1 x 10.5cm and 2 x 7.5cm. Cut 2cm off the bottom of the two smaller pieces so they measure 7.5cm x 7cm (or you can just make the pockets whatever size suits the toy you are making for.
- Fold in the two side edges and the bottom edge of each pocket and press. Mark the centre of the inside piece of your bag with a pin. Pin the pockets and ribbon in place to the left of the centre mark and stitch.
- Pin the handle to the centre top of the bag so the raw edges overlap the raw edges of the bag. Do the same with the closure piece and stitch them both in place close to the edge.
- Now you need to attach the second piece of velcro. With wrong sides together, put the quilted piece together with the outer cotton piece and fold in half as if you are closing the bag. Fold the closure over the outside and marke where the velcro piece should go. Stitch the velcro to the outer cotton piece only in the marked position.
- Put both pieces right sides together, tucking the handle and closure inside, and pin. Stitch all the way around, leaving a 8cm opening for turning. Clip curves and turn right sides out. Poke all the edges out with your fingers or a chopstick. Pin the opening closed.
- Stitch close to the edge all the way around, catching and closing the turning opening.
- You're all done. Go and make a little girl very happy!
Thursday, May 27, 2010
My Creative Space - Escaping the rain
- Cut out three or four 2 inch wide strips about 1 1/2 times the length you want them.
- Set your machine to the longest stitch length and stitch down the middle of each strip. Carefully pull one of the threads to gather your piece to the length you want it.
- Pin all the pieces to the front of the outfit you are decorating (I used a pin at the top and the bottom and one in the middle to secure it).
- Stitch down each strip (remembering to adjust your machine back to the normal stitch length), removing the pins as you go. Back stitch at either end to make sure the strips are secure.
- If you use knit fabrics, the strips won't fray. You could do something similar with wide grosgrain ribbon.
Monday, January 25, 2010
Bed valance with pockets tutorial
self adhesive velcro dots
7. Make sure that your pockets are all the same size (or the sizes you want if you are making different sized pockets for your valance). Top stitch across the top. Do this with all four pockets,
Thursday, January 7, 2010
Welcome to the world little man

To make a book cover like mine, you can follow the following instructions. I always allow a little extra for seam allowances when making book covers as it's always good to have some extra to play with. If you are a very accurate sewer, adjust the measurements to make the seam allowances smaller. Okay, so to make your book cover:
- Open out your book and measure the length and width of it.
- Add a 3cm seam allowance to either end of your width measurement so if your book is 10cm wide, then your fabric needs to be 16cm wide.
- Now add the 3cm seam allowance plus 6cm fold over allowance to each side of your length measurement. So if your long side is 15cm long, the total length would be 15cm + 3cm + 6cm + 3cm + 6cm = 33cm.

- Cut two pieces of fabric in your measurements eg 16cm x33cm. Embroider your outside piece at least 9cm in from the right hand edge.
- When your embroidery is finished, place the two pieces right sides together and stitch a 1.5cm seam allowance all the way around, remembering to leave a 4cm opening for turning.
- Clip the corners and neaten the seams.
- Turn right sides out and making sure that all the corners are sharp (use a pin or needle to tease them out if they aren't), press your cover. Fold in half to find the centre and tuck your book inside.
- Open the book out and fold the edges in about 6cm. Pin them in place and close the book to check that it fits. If its too loose or two tight, adjust the flaps and test again. When you are happy with it, adjust your machine to a longer stitch length and stitch along the top and bottom edges, close to the edge and closing the turning opening as you go.
Thursday, October 8, 2009
This time last year...
... I was getting all glammed up ready for a fab night out at the NZ Music Awards. This year, I have the awards on TV and I'm wearing an apron covered in little bits of snipped off thread and I'm making marmalade and dress-up capes.I do of course look extremely glamourous in my pinny as it is a Fireworks Agnes one which I bought at last months Devonport Craft Market. It is rather beautiful and even has a little net skirt underneath it. I shall have my picture taken in it when my other half is not out gallavanting with the Hoi Polloi of New Zealand's Music Industry.

The Snow Queen and her kitty cat
These capes are spectacularly quick and easy to make. They took me about 20 mins each (but I do have my sewing machine and scissors all out and ready to go). They'd probably take a beginner about 45 minutes tops.
To make a cape that will fit a child aged between about 3 and 7 (just make it longer and wider if you want it larger), choose your fabric and fold it in half. You need two pieces for the cape. Cut the hood out first:
Cut the longest edge (the back) on the fold.
Next, cut out the cape part which is essentially a big semi-circle:

Remember that this is on the fold so when you open it out you will have a semi-circle which will form the cape. Again, its the longest part that goes against the fold.
Now to sew it all together.
Put the hood piece right sides together and stitch along the top (be careful here as its easy to get mixed up). If you have some pinking shears and the cape is unlikely to be washed much, you can pink the raw edge at the front to finish it, but I would suggest hemming it as if your kids are like mine, they will put it on, run outside, wait until you nip inside to grab your camera, fall over and get covered in the most revolting black mud. They will then come inside with muddy feet that resemble those of a hobbit in order to show you that they have mud everywhere. Anyway.... to hem it, just turn the front edge over 1cm and fold it over again by 1cm. Pin or press it in place and stitch.
Now grab your cape, fold it in half and match up the middle of the back of the hood to the fold point. Pin the hood, right sides together, to the cape and stitch it on. You will have two long flappy bits either side. Don't worry about them. They look good when the cape is on, honestly.
Hem the edges of the cape in the same way as you did the hood, attach a couple of pieces of ribbon either side of the hood and you are done.
If you want the snow queen cape, just add a bit of maribou around the hood. You could make it in green or black for elves and witches and I'm quite sure there are lots of warriors out there that need some hooded capes. You can leave the hood off and just use the cape bit to make... um... a cape. Use my applique tutorial to add a dragon or a super hero sign. The options are endless.
Have fun. I'm off to paint my nails or something else hugely glamorous.
Wednesday, September 23, 2009
Its raining its pouring
What a wet and windy and 'orrible day it is today. A big difference from those balmy Spring days of last week. I'm keeping Eloise entertained by printing off colouring in pages from this fab website . She's having a ball.
I've been working on some things for my stall at The Devonport Craft Market and some more new Summer clothes for the girls. I'll be adding some tutes for creating a little girls summer wardrobe shortly so watch this space.Friday, August 14, 2009
Travel Activity Pack Tutorial
I made this bag from Kwik Sew pattern 3612 but added pockets to hold all the bits and pieces that I can never find in normal bags.
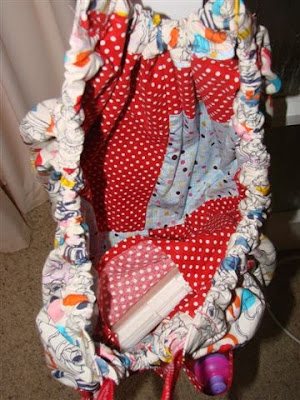
And I made the girls these activity packs to hold all their colouring bits and pieces. I got the basic idea from this tutorial but changed it to suit my needs.

Here’s how you make one big enough to fit a couple of A4 size colouring/reading books, 6 felt pens, a pencil and a pocket for other bits and pieces like stickers and treats.
You will need:
Fabric, small piece of velcro, interfacing or thin wadding, Scissors,
Sewing machine
Straight edge
Rotary cutter and mat (optional)
Tailors chalk or disappearing ink pen
Preparation:
Cut out 2 oblong pieces of fabric. Mine were 23"x16"
Cut out one piece of thin batting or stiff interfacing (I used stuff for handbags) in the same size as the fabric
Cut out a long pocket piece the same length as your outer and lining pieces and about half the height.
Cut out a smaller pocket piece (about 8 1/2“ x 6 1/2” )
Cut out a long d-shaped piece for the outer flap (see pic further down)
1. Take your lining piece and pin it to the wadding or attach fusible interfacing. Fold over the top of the long pocket twice and hem the edge.

2. With the right side of the lining face up, pin the pocket to the lining piece. With your ruler, mark the middle point with tailors chalk or disappearing ink pen.
3. Mark vertical lines over the rest of the pocket wide enough to fit your pens or pencils. Mine were thick pens so I spaced them 1 ½ “ apart. 
4. Turn the top of the small pocket over twice and press. Turn over the other 3 edges once. Pin the pocket on to the left hand side of the folder, above where the pens will go. (see above)
5. Stitch the pocket in place and stitch along the vertical lines of the pen pockets. This is what it will look like on the underside of the wadding/interfacing.
6. Stitch around the d-shaped flap piece. Clip curves and turn right side out. Press and top stitch close to the edge. Attach a piece of Velcro (the rough side) to the top edge of the flap.
7. Place the flap Velcro side down in middle of the right hand edge of the lining piece. Make sure that there is a bit of an overhang from the flap piece to make sure it stays there securely. Put the cover piece face down so the pieces are right sides together and pin
8. Stitch all the way around the rectangle leaving a gap for turning. Trim edges and clip the corners. Turn right side out and press tucking the turning opening edges in. Top stitch all the way around catching the opening as you go.
9.Fuse a piece of felt to double sided fusible webbing. Cut out a letter shape of your choice. Peel off paper backing and fuse it on to the closing flap piece.

10. Mark with pins where the soft part of Velcro needs to go and hand stitch it in place.

You’re all done! Fill it with pencils/pens and books and give it to your favourite kiddliwink. Let me know if you make one of these and come across any problems.


